VirtueAlley™

Background

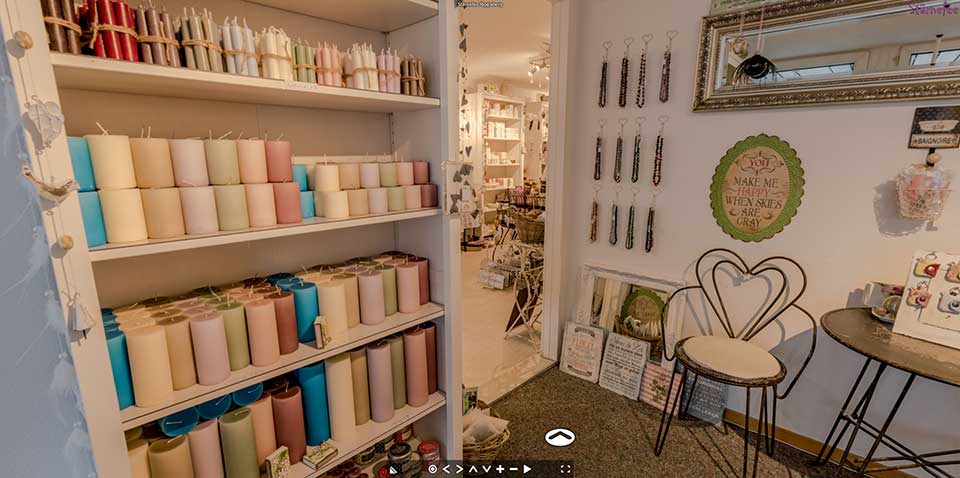
The introduction of 3D virtual-virtual galleries. The idea behind is to create online galleries, similar to virtual tours made from 360 photographs, but in full 3D.

Not only the presentation is virtual, but also the shown content is produced virtually in 3D. Hence «virtual-virtual». But a more clever name had to be put in place since «virtual-virtual virtual gallery» would not only be a tong breaker, but also lame.

Using the name «VirtueAlley™» to me symbolizes two components that fit well in my view.

Virtue stands for value, merit or worthiness. A possible description would be: «a quality that gives something special worth»

Alley stands for path, lane or route. Path to me symbolizes the path I am on and it also has this touch of a side alley with art shops in Paris.

Hence the term «VritueAlley™» was born.
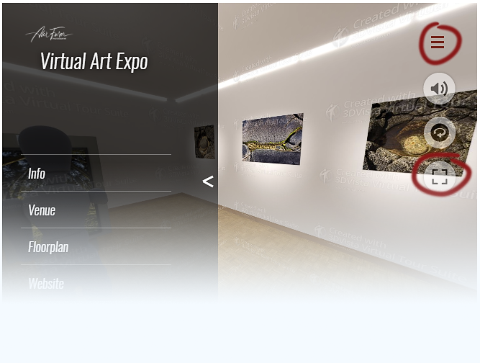
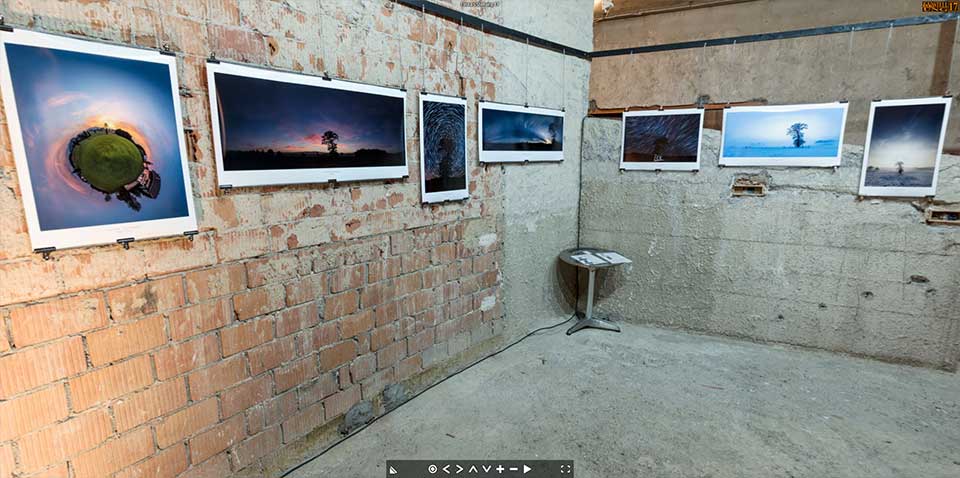
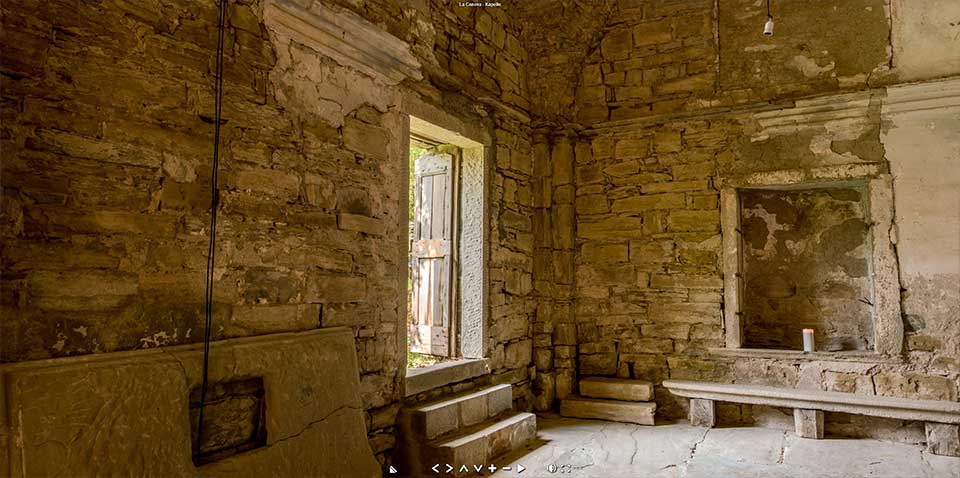
Demo

Click here to see the interactive demo

And here is a video of it.

Technical Aspects

Creating 3D for the web was something I followed closely for the past 30 years. Always from a content creator point of view. Always on the lookout for inspiring ideas and concepts I saw this Lightroom plugin called Galeryst in one of the Adobe newsletters. It offers the possibility for photographers to create real 3D interactive galleries directly from Lightroom.

While this is definitely a very viable tool for photographers to present their work online, in a very integrated way, the visual appearance of Galeryst is debatable. I learned that the developer has focused on the technical side of this, especially the expandability of the procedurally developed galleries and it’s integration into industry standard tools and workflows.

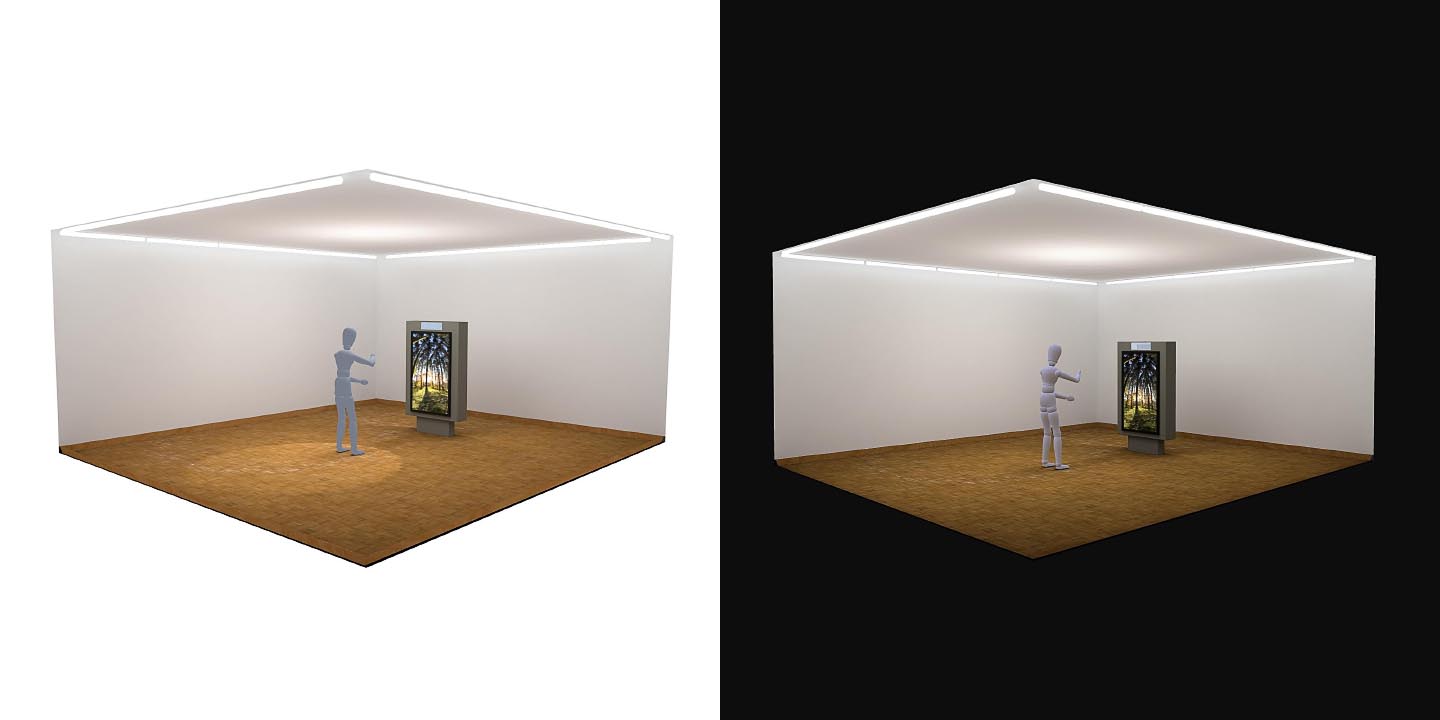
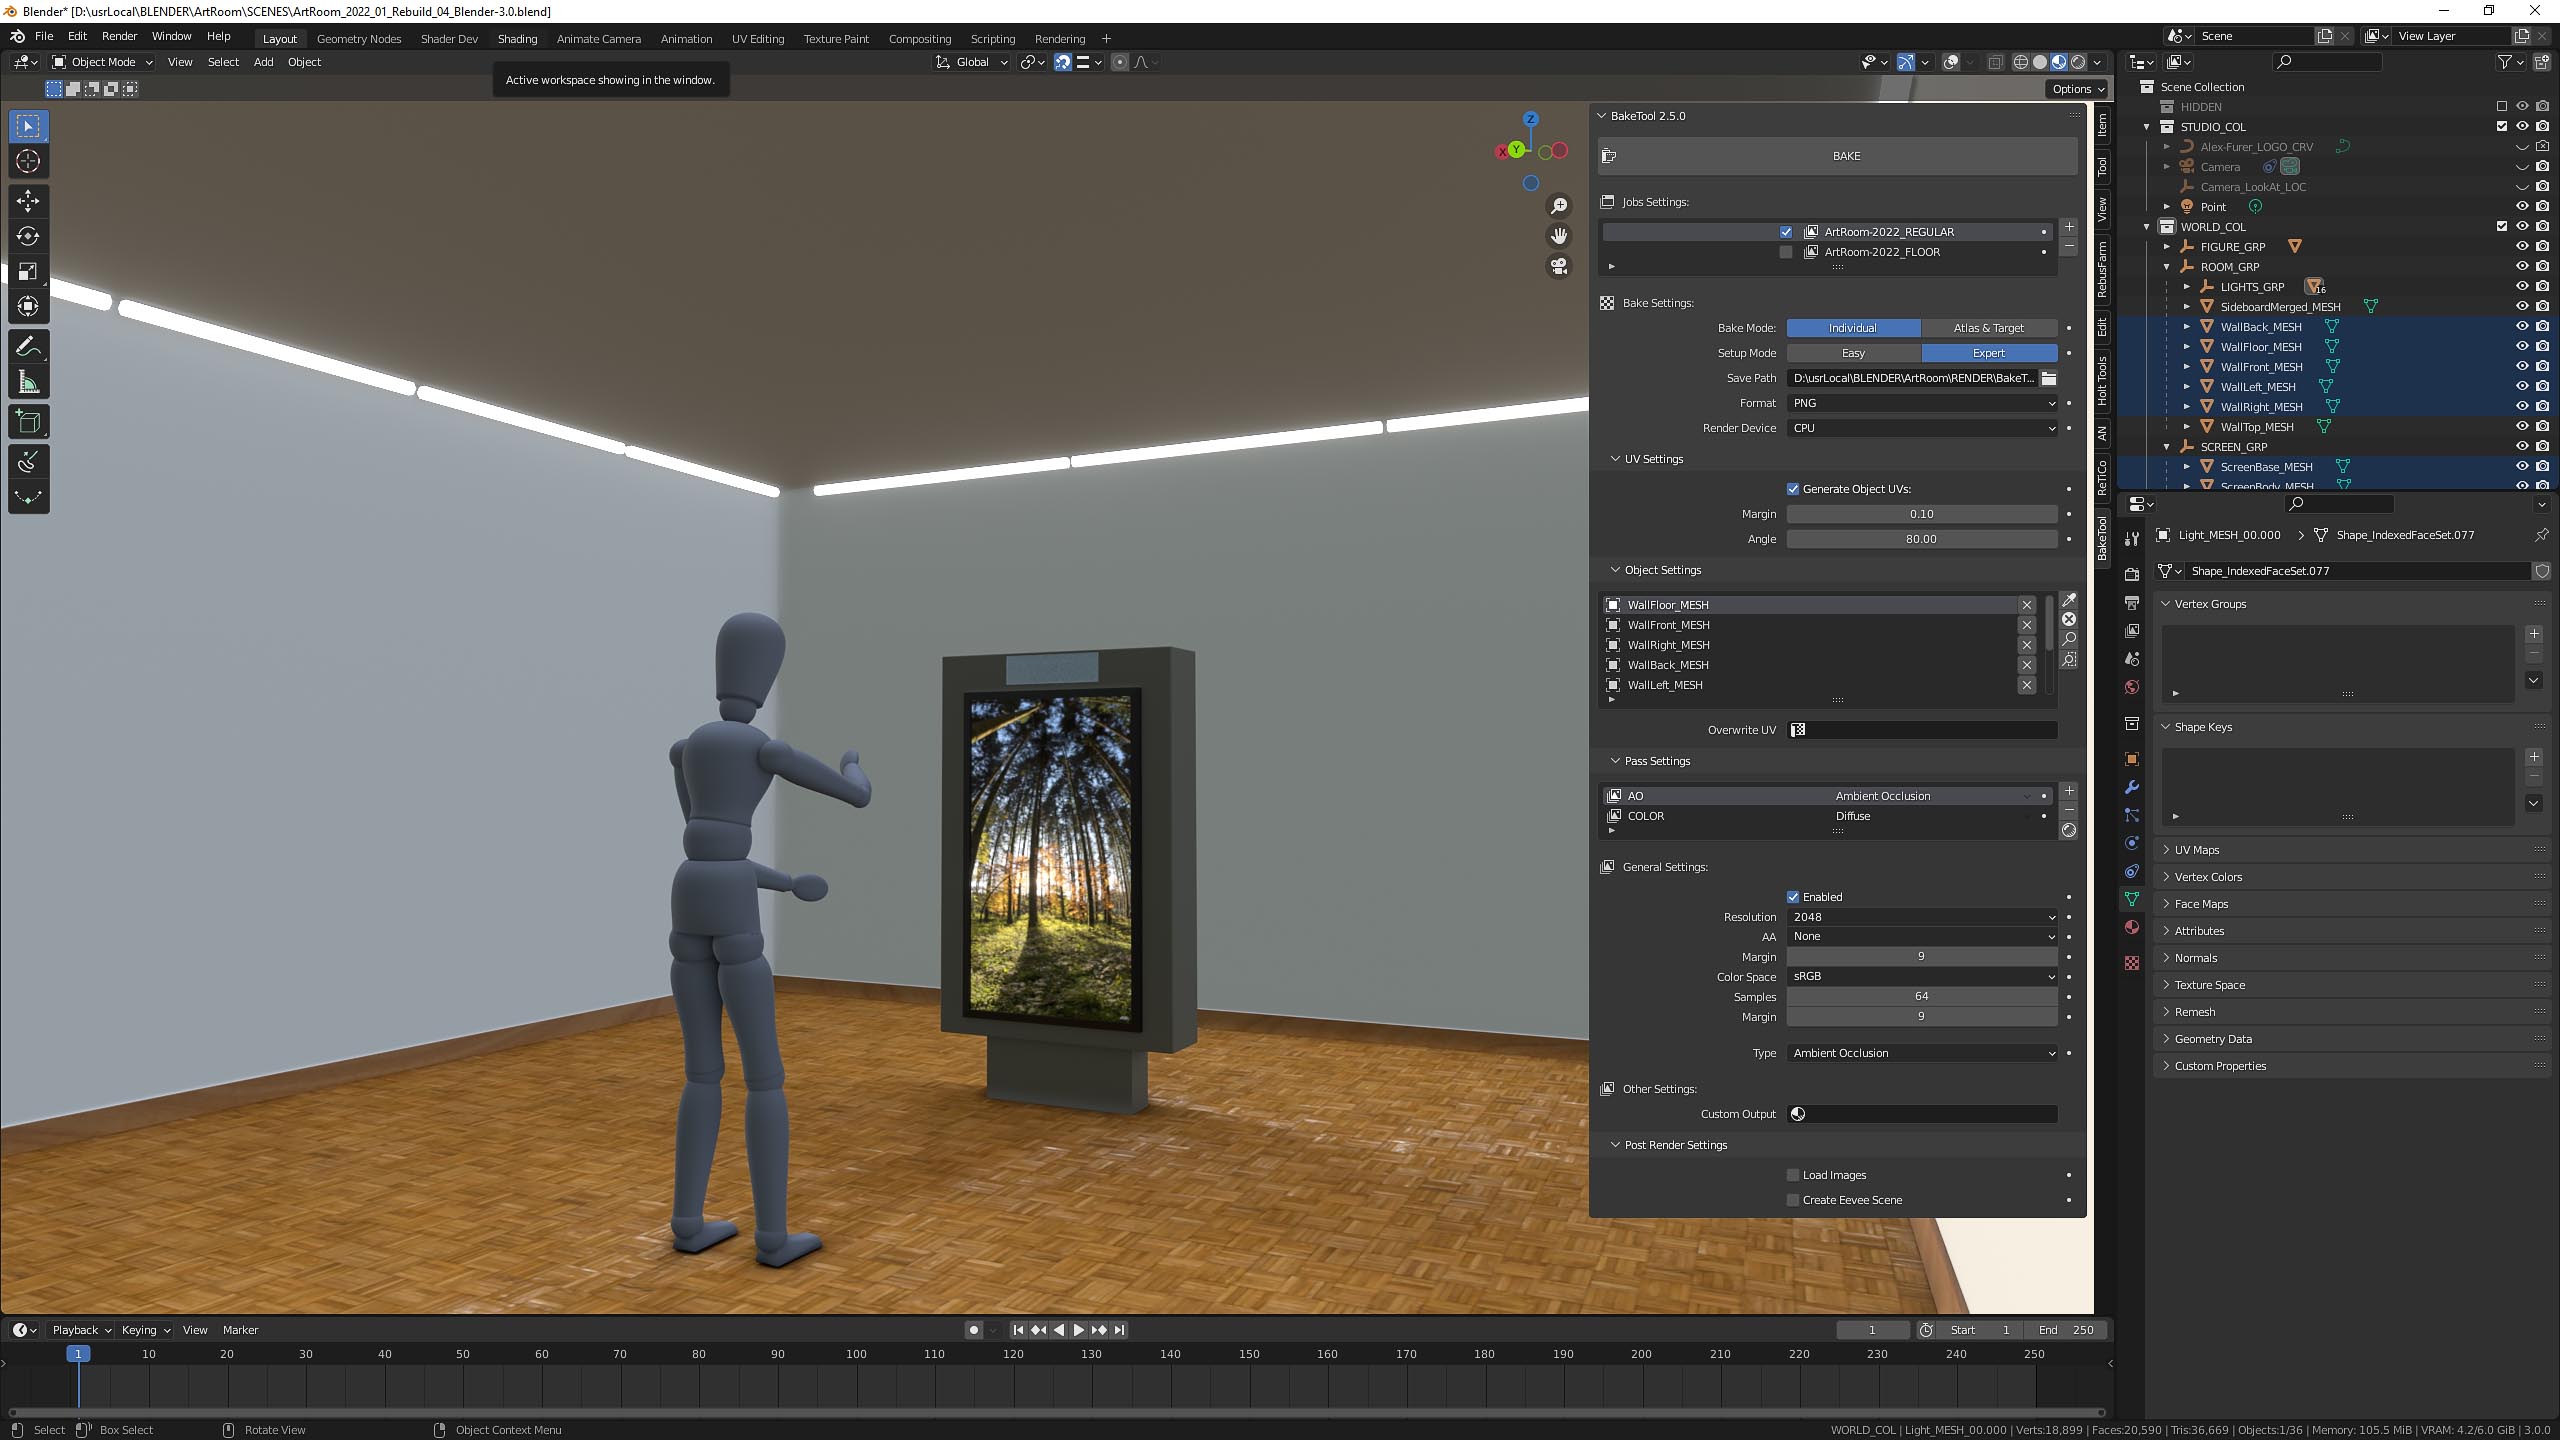
Being an artist with very mediocre programming skills, I tackled this from the visual end. So I was very happy to discover the BabylonJS framework as described here.

Since I had my ArtRoom already revamped and ready to go, it was a breeze to load this into a canvas inside a html page with the BabylonJS. The way I go about coding projects is always that I search for lines of code that do what I need and then fiddle around until it works within my project. Fortunately BabylonJS is hosting an online editor very large library of examples and has an excellent documentation.

You might are familiar with this feeling. «One is always more clever after the fact». No difference here. I always start somewhere, using certain tools I am aware off, and once a run through is complete on such a research project, new ways will have shown up. And most likely the path I take on the first run is more cumbersome than need be.

Next Steps / Vision

The sky is the limit, right? So yeah, here’s what’s on my mind

  • Add capability for user to upload images to be hanged and shown in the modal (lightbox)
  • Automatically scale the polygons to the aspect ratio of the uploaded image
  • Add capability for the user to hang the images where desired
  • Add capability to draw floorplan, including doors that connect to more rooms
  • Automatically bake the needed textures OR convert the demo to photorealistic rendering instead of baking

So, I need to put the big pants on and learn, learn learn (or find some poor soul that codes this up for me 🙂 )

  • Get a real development environment up and running as described here
  • Get the BabylonJS Editor up and running

3D ArtRoom 2022 – Update

I reworked the ArtRoom, which I revived, and re-baked and exported it from Blender to BabylonJS, to the glTF (.glb) file format specifically from Blender.

I mainly added plates to put my photography on. I also tried to put a dedicated environment into the scene, but somehow the .babylon file is broken after exporting it. What I did is drag and drop the Blender export onto the BabyonJS sandbox and saved it as BabylonJS and glTF. But for some reason the environment did not come across.

But since I set all objects to «unlit», this doesn’t really matter that much.

Update April 16. This above is a heavily optimized version. A bit more moody, smaller textures and reduced figures polycount more manually. Basically the file went from 96 MB to 2 MB. Workflow seems stable.

I export from Blender using the built in glTF exporter, import that into the BabylonJS Sandbox, tweak a few things and export it from there. A very big help in all my work going to JPG is Greg Benz’s WebSharp PRO. Highly recommend adding this to your workflow as well!

Create your own environment (still unsolved)

So, technically, to create an environment go here.

Then:

  • drag and drop a hdr image
  • save the env
  • drag and drop the saved .env scene onto a sandbox scene

    But as said above, somehow the exported scene is broken. It cannot be re-imported to the BabylonJS sandbox…

Next Steps

  • Next step would be to code it up and make the images clickable.

Build Virtual-Virtual Gallery in Blender

  • Build room/gallery
  • Light and texture it
  • Setup frames for images on display
  • Render 360 Equirectangular image (Create folders to keep tests separate from final. This way the images can have the same name for replacing them in 3DVista.)
  • Import to 3DVista
  • Setup Skin, Floorplan etc.
  • Create hotspots in each image to all other locations (no return point!)

And here’s the result

NOTE: Make sure you click the fullscreen button for the best experience.

Workflow / experience

note to self – write something 🙂 And yeah, I got a lot to write about this. I really really like 3DVista and I will be owning a licensed copy of it very very soon.

BabylonJS

I have always looked for possibilities to display 3D content on the web. Many authoring software packages or plugins came and died. Now there’s a new initiative that looks very promising. Modern, sexy (yes, I still use that description, sue me!), easy, flexible and just cool.

It’s called BabylonJS and you can find all information about it at their website.

Together with Blender3, the Blender BabylonJS Export plugin and the baking plugin BakeTools one is up and running very fast. Here’s a good tutorial on how to export from Blender using this plugin. I also just found this here. I will give it a try on my next run at this.

It’s then very convenient to load the exported scene into the BabylonJS sandbox where textures can be loaded or replaced and the materials can be tweaked. Plus there’s a lot more settings that can be set. Like how far down the user can tilt the camera, or add a dedicated environment and much more. And the Java capabilities of the Framework the sky is the limit 🙂

Also there’s a WordPress plugin to display your models on your website, stored local or in the cloud! Actually there is two plugins. More about them here.

Example; ArtRoom 2022 (revived)

I revived a project I did with Vera Liechti many years ago. We entered an exhibition contest and wanted to present Vera’s oil paintings interactively. Meaning we built in a stereo camera (something like a kinect) and the visitors could interact with the artwork by moving their body. The visitor could then step on a button and the version of Vera’s painting would have been printed and the visitor could take that print home. Here’s the PDF we submitted. Unfortunately we were not accepted. We had a working prototype. Here’s the previz data from then now reworked in Blender and exported to Babylon JS.

Blender «BakingTool» Addon

While getting nice results with the built-in baking in Blender, There’s no way to denoise the renders while rendering. That’s not a biggie, as the compositor can easily be used to denoise the results.

But the baking is sorta cumbersome and very manual. So I was looking for a solution that would automate this a bit. First I tried this GitHub project called «Lightmapper«. But even after hours of testing, running various Blender versions etc. I simply did not get any images out of it. It rendered for 0.0 or 0.01 seconds and nothing. I am sure I missed something, but as it looks like a cool solution. Give it a try! Projects like those are not priceless because they’re free, but many times they combine the best of many commercial tools. But there’s always the «which version of host app to run with which version of the code» problem. Which is not the case with commercial products.

So I found the apparently most well known Blender baking tool called «Baketool«. Bought it, installed it, played with it, consulted their documentation and watched a video or two and I was up and running and it rendered images in no time.

While there’s more than «Baketools» and the Github project «Lightmapper», I am happy with my purchase of «Blendtools». I found my list here. Give it whirl, you might find something that suits you.

Final bake in Blender (left) and the in the BabylonJS Sandbox (right)

Side note: I added a point light for more illumination than just from the neon tubes with an emissive material. And also a spot light to bake the figure.

Process

The process is very easy with this addon.

  • Create a new Job
  • Decide the baking mode (Individual or Atlas & Target)
  • Setup mode, save path, Image format and render device
  • UV settings (Good at default)
  • Then add the object you want to bake
  • Choose the render passes
  • Hit «Bake»

My setup

  • Created a job called «ArtRoom-2022_REGULAR»
  • Chose to bake individual surfaces to texture
  • Enabled «Expert» because it has more options
  • Set path, chose PNG and CPU (with my 1060 there’s not much difference to CPU…)
  • Added all the meshes I want to bake
  • Setup AO and Diffuse pass to be rendered (more samples on AO for less noisiness)
Baketool setup in Blender
Result Diffuse and Ambient Occlusion

Workflow 360 Panos

So, I’ve been working with the Theta Z1 camera and developing a workflow.

One of the biggest challenges in this was to find a HDR-Merging software. I know, Photoshop and Lightroom do merge HDRs, but the result bares too much work. So I evaluated various software.

While all those packages bare their advantages or shortcomings my main intend was really to find the one that gives me a «one click» result.

My conclusion was to buy SNS-HDR. Firstly because it creates a very good starting point and very natural look. Runner-Up was easyHDR. I particularly like how one can manually paint masks for the de-ghosting. Which is one of the weaknesses of SNS-HDR. But for now I purchased a license to SNS-HDR.

One thing that has to be noted is that the developer of SNS-HDR is not investing much time into the software unfortunately. He maintains it and is responsive when emailed. But the forum is kinda clumsy and old fashion plus manual post approval is in place. But I am all about visual and in this case also the ease of use.

I am after a workflow that is semi automatic for lower budget productions. With this setup a lot of 360 spheres can be shot and processed at an affordable budget compared to using my motorized DSLR setup.

What I wanted, as said, was a semi automated workflow. So drag and drop and continue without a lot of manual work and I was also looking to find a way to enlarge the image. As big as they are coming from the camera, I was curious to see if this can be pushed towards printing quality results.

After changing it a few times here’s what I ended up as a workflow.

  1. Shoot brackets in manual mode, 2 EVs apart, 5 shots
  2. Import the shots to Lightroom for cataloging and tagging
  3. Merge the DNGs to an HDR
  4. Take this merged image back to Lightroom for further adjustments and local adjustments
  5. Opening the result in Photoshop and denoise it using Topaz Denoise AI
  6. Resize the image using Topaz Gigapixel AI
  7. Take the resized image to PTGui and stitch it to equirectangular
  8. Go back to Photoshop and fix the chromatic aberration and export to a flattened image
  9. Export the interactive to html using PanoramaStudio

Here’s the screenshot of the Excel sheet I created containing all the workflow information in detail.

While this seems a lot of steps it’s actually mostly clicking buttons, running actions in Photoshop and saving. Except in step 3 where I might adjust the parameters in SNS-HDR and step 7 where I paint a mask to eliminate chromatic aberration, retouch the shadow or reflection of the camera out and fix the nadir, plus place my logo at the nadir. How I do that is a secret, but I use Photoshop, despite the fact that they removed the 360 projection mode. I also own Affinity Photo which I got for this purpose, but I am skipping it for now as my 30+ years in Photoshop is an investment I will keep hanging on to as log as possible. Stubborn, yes! But those manual edits shall be kept short and effective 🙂 (Like there is something short and effective in a perfectionist mind…)

And off course the «authoring» of the final tour in PanoramaStudio. I am currently looking at alternatives to work more efficient in that area and I am evaluating 3DVista, Kuula. I really like Kuula. It creates nice transitions and it’s got a lot of features best described in Ben Claremont’s video here. The only thing it really lacks is the ability to export the tour to Google Street View.

There are tools that take care of this. I am currently evaluating Panoskin and GoThru. But ultimately I will switch to 3DVista, I already know that. But 500 Euros is hard to swallow when starting up a new business branch. And my main intend for now is to take nice 360 panos when I am out and about with our lovely dog Hira.

RICOH Theta Z1

I got a RICOH Theta Z1. I researched almost any 360 camera that is out there. OK, I did limit my budget to max 1500.-

The Theta Z1 became my choice mainly because of the 1 inch sensor. As good as the images from an iPhone (or alike) look, this only applies if there’s enough lights. The main 2 reasons for this is the small sensor and the tiny lens.

Here’s a unbiased review of the man himself, Mic Ty, which helped me a lot to make the decision. Mic is the source for all things 360. And his responsiveness is awesome. I encourage you to check out his YouTube channel, like and subscribe, or don’t, it’s up to you.

I will be using the Theta Z1 mainly for photography, so video was not my concern.

And when the 51 GB version landed I hit the «Buy Now» button.

PROs

  • Sensor Size
  • Shoots in DNG
  • Image quality
  • Manual modes
  • Sturdy Body
  • Plugins
  • Variable aperture
  • Standalone Stitcher (Windows & Mac)

CONs

  • Chromatic Aberration
  • No removable Battery!
  • Fixed Storage
  • Video not up to par
  • Screen is small (But quite irrelevant, since there’s a good app)

Blender «Little Planet» Tutorial

On my journey to learn Blender I found this tutorial by Studio Gearnoodle on Youtube.

I took the opportunity to practice modelling, animating and lighting techniques I learned so far and model my own mushrooms and buildings. Basically I am trying to apply the knowledge I’ve acquired for the past 25 years doing 3D to the Blender interface.

I gotta say, Blender is on to something here. They really are taking the right direction and are providing a full fleshed package and with their philosophy of «everything nodes» the potential is huge. And free! Yes, OpenSource!

«Unleash the beast» – Houdini

On my journey to leave Maya behind me and not being involved in any 3D production work I started to learn some Houdini.

Since I saw it the first time back at Siggraph in 1996 I was drawn to it. But my professional jobs never left any time to dig into it.

I really love Houdini and I find it the best package out there. But… It became very clear very fast that to become proficient in using it would need a large junk of time.

Nevertheless here’s my interpretation of a tutorial by Nine Between.

Institute of Pharmacology «GH-Receptor»

This is an animation about growth hormone receptor docking and the effect of Pegvisomant and antibodies.

This was the first animation I did in Blender. Shoutout to Joseph Manion which is running the youtube channel CG Figures for providing the basic setup for the Phospholipid Bilayers!

From Autumn 2019 until Summer 2021 I worked in the research group of Prof. Stephan von Gunten at the «Institute of Pharmacology» at the University of Bern, Bern Switzerland, as a 3D instructor and animator.

Institute of Pharmacology «T-Cell Animation»

This is an animation showing a T-Cell that connects to a cell and is able to discharge when the cell is not covered with sugar crystals but fails if the cell is completely covered.

From Autumn 2019 until Summer 2021 I worked in the research group of Prof. Stephan von Gunten at the «Institute of Pharmacology» at the University of Bern, Bern Switzerland, as a 3D instructor and animator.

Institute of Pharmacology «Saccharification»

This is an animation showing a T-Cell that connects to a cell and is able to discharge when the cell is not covered with sugar crystals but fails if the cell is completely covered.

From Autumn 2019 until Summer 2021 I worked in the research group of Prof. Stephan von Gunten at the «Institute of Pharmacology» at the University of Bern, Bern Switzerland, as a 3D instructor and animator.

Institute of Pharmacology «Virus Animation»

This is an animation about the process of a virus docking to a cell, entering the cell and getting the cell to replicate the virus multiple times and the replicated viruses exiting the cell.

From Autumn 2019 until Summer 2021 I worked in the research group of Prof. Stephan von Gunten at the «Institute of Pharmacology» at the University of Bern, Bern Switzerland, as a 3D instructor and animator.

Stärnefee Panorama & Website

I had the honor to create 360 degree panoramas of this lovely store in Riggisberg called Särnefee. It’s an art-deco store with loads of treasures and beautiful things.


I also did their website and the detail photos in the store (mostly used as backgrounds on the website).

Under Her Black Wings

We were joung, wild at heart and dedicated!


These images were taken by Christian Helmle at our practicing room in the Selve Areal in 1991.

Nikon D810

I a proud to be a new owner of a Nikon D810. This is the best camera I ever hel in my hands. The design is just wow. Already when you pick her up, you ralize that this body is made for professionals (oh, wait, that’s sexist…). The features and the way the buttons are setup is very well thought through. Compared to the Canon D1100 I had, it’s a complete different realm. And off course, the best thing about the D810 is the pictures it delivers. The Sensor is a beast and the dynamic range it produces is phenomanal.
nikond810
I was split between the D750 and the D810. The D810 has the best Sensor you can get in a DSLR today. The D750 has a lot of new features like built in WiFi, swivel screen, awesome filming features etc. But for me the main reason to go for the D810 was the sensor. I am taking pictures of peoples paintings so they can print them in various sizes and therefore I need all the pixels I can get. Plus I was able to score a used body for the price of a new D750 at a professional shop. The body has only 9k exposures and Nikon warranty until the end of next year. So after almost a year of reserch and debates with myslef, the decision was easy.

Block zooming of Google maps

Google maps are used almost everywhere to either implement an address of a business, club, store or anything else on a lot of pages on the internet. It’s a nice and convenient way to do it.

BUT… almost on all pages where this is done, when you scroll down using the mouse wheel, once the mouse ends up inside the Google map, the map starts zooming out instead of the page continuing to scroll down.

Here’s how to make a Google map not zoom in or out when you scroll down a page with the mouse wheel and only zoom, pan or do anything with the Google map as soon as you click inside the map. The following workflow also blocks zooming again once the mouse leaves the Google map area.

I got this from Stackoverflow, reproducing it here in case the zombie apocalypse breaks out and stackoverflow goes bun bun.

First you want to add the following style to your website or custom CSS script in your WordPress installation:

.scrolloff {
  pointer-events: none;
}

Then you want to add the following JavaScript to the page:

<script type="text/javascript">
    jQuery(document).ready(function($) {
    console.log("allLoaded");
        // you want to enable the pointer events only on click;
        jQuery('#map_canvas1').addClass('scrolloff'); // set the pointer events to none on doc ready
	console.log("scrolloffAddedA");
        jQuery('#canvas1').on('click', function () {
	    console.log("clickDetected");
            jQuery('#map_canvas1').removeClass('scrolloff'); // set the pointer events true on click
	    console.log("scrolloffRemoved");
        });
        // you want to disable pointer events when the mouse leave the canvas area;
        jQuery("#map_canvas1").mouseleave(function () {
	    console.log("mouseLeft");
            jQuery('#map_canvas1').addClass('scrolloff'); // set the pointer events to none when mouse leaves the map area
	    console.log("scrolloffAddedB");
        });
    });
</script>

Note that I have a whole lot of echo’s in the code which let’s you debug the code. You might want to consider switching that off for efficiency.

And finally that’s how you want to embed the map itself:

<section id="canvas1" class="map">
<iframe id="map_canvas1" src="https://www.google.com/maps/embed?pb=!1m18!1m12!1m3!1d87147.27677140976!2d7.324830610654608!3d46.95476576996358!2m3!1f0!2f0!3f0!3m2!1i1024!2i768!4f13.1!3m3!1m2!1s0x478e39c0d43a1b77%3A0xcb555ffe0457659a!2sBern!5e0!3m2!1sde!2sch!4v1462400079917" width="100%" height="485" frameborder="0" style="border:0" allowfullscreen></iframe>
</section>

Here is how this looks like in the end:


Posting source-code on self hosted WordPress

Psoting code on your WordPress Blog or Website

There’s a very easy, nice way to show source code on your blog or website.

If you are hosting your site on WordPress.com it’s even natively implemented.

Read the article on WordPress.com

If you self host your website or blog, you will need this plugin.

Here’s some examples of source code:

Some CSS code:

.scrolloff {
  pointer-events: none;
}

A JavaScript:

<script type="text/javascript">
    jQuery(document).ready(function($) {
    console.log("allLoaded");
        // you want to enable the pointer events only on click;
        jQuery('#map_canvas1').addClass('scrolloff'); // set the pointer events to none on doc ready
	console.log("scrolloffAddedA");
        jQuery('#canvas1').on('click', function () {
	    console.log("clickDetected");
            jQuery('#map_canvas1').removeClass('scrolloff'); // set the pointer events true on click
	    console.log("scrolloffRemoved");
        });
        // you want to disable pointer events when the mouse leave the canvas area;
        jQuery("#map_canvas1").mouseleave(function () {
	    console.log("mouseLeft");
            jQuery('#map_canvas1').addClass('scrolloff'); // set the pointer events to none when mouse leaves the map area
	    console.log("scrolloffAddedB");
        });
    });
</script>

And here’s the list of supported languages:

  • actionscript3
  • bash
  • clojure
  • coldfusion
  • cpp
  • csharp
  • css
  • delphi
  • erlang
  • fsharp
  • diff
  • groovy
  • html
  • javascript
  • java
  • javafx
  • matlab (keywords only)
  • objc
  • perl
  • php
  • text
  • powershell
  • python
  • r
  • ruby
  • scala
  • sql
  • vb
  • xml
DSGVO Cookie-Einwilligung mit Real Cookie Banner